#1: Minimal working blockchain
Overview
The basic concept of blockchain is quite simple: a distributed database that maintains a continuously growing list of ordered records. In this chapter we will implement toy version of such blockchain. At the end of the chapter we will have the following basic functionalities of blockchain:
- A defined block and blockchain structure
- Methods to add new blocks to the blockchain with arbitrary data
- Blockchain nodes that communicate and sync the blockchain with other nodes
- A simple HTTP API to control the node
The full code that will be implemented in this chapter can be found here.
Block structure
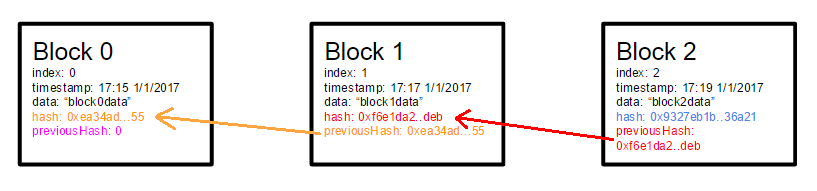
We will start by defining the block structure. Only the most essential properties are included at the block at this point.
- index : The height of the block in the blockchain
- data: Any data that is included in the block.
- timestamp: A timestamp
- hash: A sha256 hash taken from the content of the block
- previousHash: A reference to the hash of the previous block. This value explicitly defines the previous block.
The code for the block structure looks like the following:
class Block {

    public index: number;
    public hash: string;
    public previousHash: string;
    public timestamp: number;
    public data: string;

    constructor(index: number, hash: string, previousHash: string, timestamp: number, data: string) {
        this.index = index;
        this.previousHash = previousHash;
        this.timestamp = timestamp;
        this.data = data;
        this.hash = hash;
    }
}
Block hash
The block hash is one of the most important property of the block. The hash is calculated over all data of the block. This means that if anything in the block changes, the original hash is no longer valid. The block hash can also be thought as the unique identifier of the block. For instance, blocks with same index can appear, but they all have unique hashes.
We calculate the hash of the block using the following code:
const calculateHash = (index: number, previousHash: string, timestamp: number, data: string): string =>
    CryptoJS.SHA256(index + previousHash + timestamp + data).toString();
It should be noted that the block hash has not yet nothing to do with mining, as there is no proof-of-work problem to solve. We use block hashes to preserve integrity of the block and to explicitly reference the previous block.
An important consequence of the properties hash and previousHash is that a block can’t be modified without changing the hash of every consecutive block.
This is demonstrated in the example below. If the data in block 44 is changed from “DESERT” to “STREET”, all hashes of the consecutive blocks must be changed. This is because the hash of the block depends on the value of the previousHash (among other things).
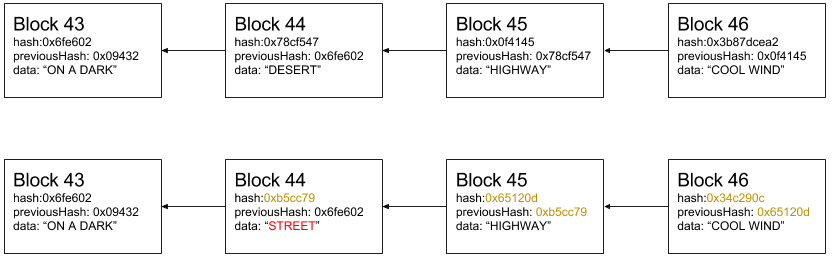
This is an especially important property when proof-of-work is introduced. The deeper the block is in the blockchain, the harder it is to modify it, since it would require modifications to every consecutive block.
Genesis block
Genesis block is the first block in the blockchain. It is the only block that has no previousHash. We will hard code the genesis block to the source code:
const genesisBlock: Block = new Block(
    0, '816534932c2b7154836da6afc367695e6337db8a921823784c14378abed4f7d7', null, 1465154705, 'my genesis block!!'
);
Generating a block
To generate a block we must know the hash of the previous block and create the rest of the required content (= index, hash, data and timestamp). Block data is something that is provided by the end-user but the rest of the parameters will be generated using the following code:
const generateNextBlock = (blockData: string) => {
    const previousBlock: Block = getLatestBlock();
    const nextIndex: number = previousBlock.index + 1;
    const nextTimestamp: number = new Date().getTime() / 1000;
    const nextHash: string = calculateHash(nextIndex, previousBlock.hash, nextTimestamp, blockData);
    const newBlock: Block = new Block(nextIndex, nextHash, previousBlock.hash, nextTimestamp, blockData);
    return newBlock;
};
Storing the blockchain
For now we will only use an in-memory Javascript array to store the blockchain. This means that the data will not be persisted when the node is terminated.
const blockchain: Block[] = [genesisBlock];Validating the integrity of blocks
At any given time we must be able to validate if a block or a chain of blocks are valid in terms of integrity. This is true especially when we receive new blocks from other nodes and must decide whether to accept them or not.
For a block to be valid the following must apply:
- The index of the block must be one number larger than the previous
- The
previousHashof the block match thehashof the previous block - The
hashof the block itself must be valid
This is demonstrated with the following code:
const isValidNewBlock = (newBlock: Block, previousBlock: Block) => {
    if (previousBlock.index + 1 !== newBlock.index) {
        console.log('invalid index');
        return false;
    } else if (previousBlock.hash !== newBlock.previousHash) {
        console.log('invalid previoushash');
        return false;
    } else if (calculateHashForBlock(newBlock) !== newBlock.hash) {
        console.log(typeof (newBlock.hash) + ' ' + typeof calculateHashForBlock(newBlock));
        console.log('invalid hash: ' + calculateHashForBlock(newBlock) + ' ' + newBlock.hash);
        return false;
    }
    return true;
};
We must also validate the structure of the block, so that malformed content sent by a peer won’t crash our node.
const isValidBlockStructure = (block: Block): boolean => {
    return typeof block.index === 'number'
        && typeof block.hash === 'string'
        && typeof block.previousHash === 'string'
        && typeof block.timestamp === 'number'
        && typeof block.data === 'string';
};
Now that we have a means to validate a single block we can move on to validate a full chain of blocks. We first check that the first block in the chain matches with the genesisBlock. After that we validate every consecutive block using the previously described methods. This is demostrated using the following code:
const isValidChain = (blockchainToValidate: Block[]): boolean => {
const isValidGenesis = (block: Block): boolean => {
return JSON.stringify(block) === JSON.stringify(genesisBlock);
};
if (!isValidGenesis(blockchainToValidate[0])) {
return false;
}
for (let i = 1; i < blockchainToValidate.length; i++) {
if (!isValidNewBlock(blockchainToValidate[i], blockchainToValidate[i - 1])) {
return false;
}
}
return true;
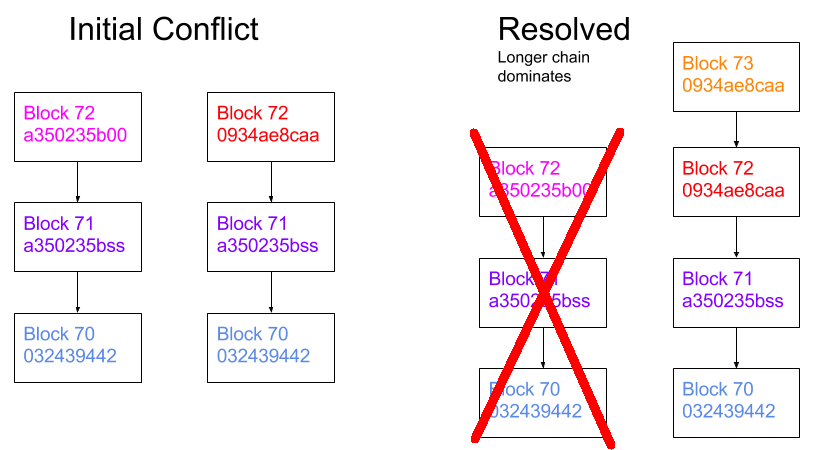
};Choosing the longest chain
There should always be only one explicit set of blocks in the chain at a given time. In case of conflicts (e.g. two nodes both generate block number 72) we choose the chain that has the longest number of blocks. In the below example, the data introduced in block 72: a350235b00 will not be included in the blockchain, since it will be overridden by the longer chain.
This is logic is implemented using the following code:
const replaceChain = (newBlocks: Block[]) => {
if (isValidChain(newBlocks) && newBlocks.length > getBlockchain().length) {
console.log('Received blockchain is valid. Replacing current blockchain with received blockchain');
blockchain = newBlocks;
broadcastLatest();
} else {
console.log('Received blockchain invalid');
}
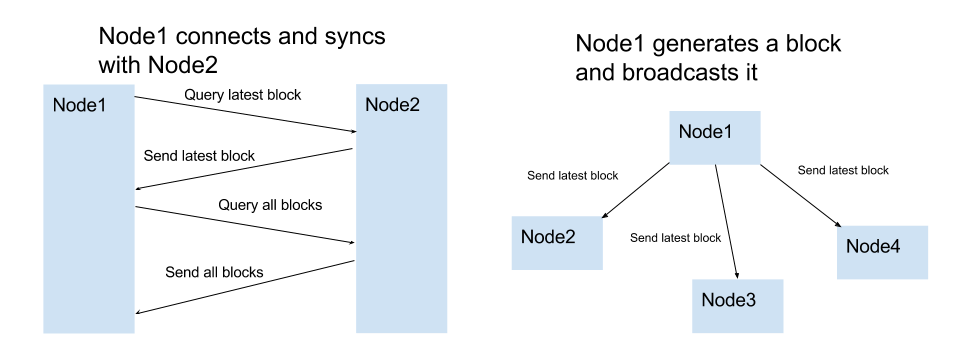
};Communicating with other nodes
An essential part of a node is to share and sync the blockchain with other nodes. The following rules are used to keep the network in sync.
- When a node generates a new block, it broadcasts it to the network
- When a node connects to a new peer it querys for the latest block
- When a node encounters a block that has an index larger than the current known block, it either adds the block the its current chain or querys for the full blockchain.
We will use websockets for the peer-to-peer communication. The active sockets for each nodes are stored in the const sockets: WebSocket[] variable. No automatic peer discovery is used. The locations (= Websocket URLs) of the peers must be manually added.
Controlling the node
The user must be able to control the node in some way. This is done by setting up a HTTP server.
const initHttpServer = ( myHttpPort: number ) => {
    const app = express();
    app.use(bodyParser.json());

    app.get('/blocks', (req, res) => {
        res.send(getBlockchain());
    });
    app.post('/mineBlock', (req, res) => {
        const newBlock: Block = generateNextBlock(req.body.data);
        res.send(newBlock);
    });
    app.get('/peers', (req, res) => {
        res.send(getSockets().map(( s: any ) => s._socket.remoteAddress + ':' + s._socket.remotePort));
    });
    app.post('/addPeer', (req, res) => {
        connectToPeers(req.body.peer);
        res.send();
    });

    app.listen(myHttpPort, () => {
        console.log('Listening http on port: ' + myHttpPort);
    });
};
As seen, the user is able to interact with the node in the following ways:
- List all blocks
- Create a new block with a content given by the user
- List or add peers
The most straightforward way to control the node is e.g. with Curl:
#get all blocks from the node
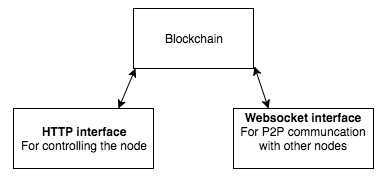
> curl http://localhost:3001/blocksArchitecture
It should be noted that the node actually exposes two web servers: One for the user to control the node (HTTP server) and one for the peer-to-peer communication between the nodes. (Websocket HTTP server)
Conclusions
Naivecoin is for now a just toy “general purpose” blockchain. Moreover, this chapter shows how some of the basic principles of blockchain can be implemented in quite a simple way. In the next chapter, we will add the proof-of work algorithm (mining) to the naivecoin.
The full final code for chapter1 cane found here.