#2: Proof of Work
Overview
In this chapter we will implement a simple Proof-of-Work scheme to the toy blockchain version. In the chapter1 version anyone could add a block to the chain without a cost. With Proof-of-work we introduce a computational puzzle that needs to be solved, before a block can be added to the blockchain. Trying to solve this puzzle is commonly known as “mining”.
With Proof-of-work we also can control (approximately) the interval on how often a block is introduced to the blockchain. This is done by changing the difficulty of the puzzle. If blocks are mined too often, the difficulty of the puzzle will increase and vice versa.
It should be noted that we do not yet introduce transactions in this chapter. This means there is actually no incentive for the miners to generate a block. Generally in cryptocurrencies, the miner is rewarded for finding a block, but this is not the case yet in our blockchain.
The full code that will be implemented in this chapter can be found here.
Difficulty, nonce and the proof-of-work puzzle
We will add two new properties to the block structure: difficulty and nonce. To understand the meaning of those, we must first introduce the Proof-of-work puzzle.
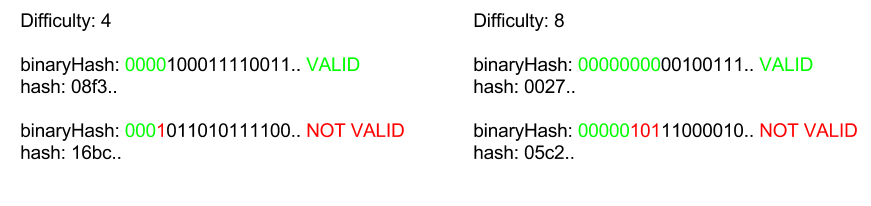
The Proof-of-work puzzle is to find a block hash, that has a specific number of zeros prefixing it. The difficulty property defines how many prefixing zeros the block hash must have, in order for the block to be valid. The prefixing zeros are checked from the binary format of the hash.
Below are some examples of valid and non-valid hashes for various difficulties:
The code that checks that the hash is correct in terms of difficulty:
const hashMatchesDifficulty = (hash: string, difficulty: number): boolean => {
    const hashInBinary: string = hexToBinary(hash);
    const requiredPrefix: string = '0'.repeat(difficulty);
    return hashInBinary.startsWith(requiredPrefix);
};
In order to find a hash that satisfies the difficulty, we must be able to calculate different hashes for the same content of the block. This is done by modifying the nonce parameter. Because SHA256 is a hash function, each time anything in the block changes, the hash will be completely different. “Mining” is basically just trying a different nonce until the block hash matches the difficulty.
Now that the difficulty and nonce are added, the block structure looks like this:
class Block {

    public index: number;
    public hash: string;
    public previousHash: string;
    public timestamp: number;
    public data: string;
    public difficulty: number;
    public nonce: number;

    constructor(index: number, hash: string, previousHash: string,
                timestamp: number, data: string, difficulty: number, nonce: number) {
        this.index = index;
        this.previousHash = previousHash;
        this.timestamp = timestamp;
        this.data = data;
        this.hash = hash;
        this.difficulty = difficulty;
        this.nonce = nonce;
    }
}
We must also remember to update the genesis block!
Finding a block
As described above, to find a valid block hash we must increase the nonce as until we get a valid hash. To find a satisfying hash is completely a random process. We must just loop through enough nonces until we find a satisfying hash:
const findBlock = (index: number, previousHash: string, timestamp: number, data: string, difficulty: number): Block => {
    let nonce = 0;
    while (true) {
        const hash: string = calculateHash(index, previousHash, timestamp, data, difficulty, nonce);
        if (hashMatchesDifficulty(hash, difficulty)) {
            return new Block(index, hash, previousHash, timestamp, data, difficulty, nonce);
        }
        nonce++;
    }
};
When the block is found, it is broadcasted to the network as was the case in chapter1.
Consensus on the difficulty
We have now the means to find and verify the hash for a given difficulty, but how is the difficulty determined? There must be a way for the nodes to agree what the current difficulty is. For this we introduce some new rules that we use to calculate the current difficulty of the network.
Lets define the following new constants for the network:
BLOCK_GENERATION_INTERVAL, defines how often a block should be found. (in Bitcoin this value is 10 minutes)DIFFICULTY_ADJUSTMENT_INTERVAL, defines how often the difficulty should adjust to the increasing or decreasing network hashrate. (in Bitcoin this value is 2016 blocks)
We will set the block generation interval to 10s and difficulty adjustment to 10 blocks. These constants do not change over time and they are hard coded.
// in seconds
const BLOCK_GENERATION_INTERVAL: number = 10;

// in blocks
const DIFFICULTY_ADJUSTMENT_INTERVAL: number = 10;
Now we have the means to agree on a difficulty of the block. For every 10 blocks that is generated, we check if the time that took to generate those blocks are larger or smaller than the expected time. The expected time is calculated like this: BLOCK_GENERATION_INTERVAL * DIFFICULTY_ADJUSTMENT_INTERVAL. The expected time represents the case where the hashrate matches exactly the current difficulty.
We either increase or decrease the difficulty by one if the time taken is at least two times greater or smaller than the expected difficulty. The difficulty adjustment is handled by the following code:
const getDifficulty = (aBlockchain: Block[]): number => {
    const latestBlock: Block = aBlockchain[blockchain.length - 1];
    if (latestBlock.index % DIFFICULTY_ADJUSTMENT_INTERVAL === 0 && latestBlock.index !== 0) {
        return getAdjustedDifficulty(latestBlock, aBlockchain);
    } else {
        return latestBlock.difficulty;
    }
};

const getAdjustedDifficulty = (latestBlock: Block, aBlockchain: Block[]) => {
    const prevAdjustmentBlock: Block = aBlockchain[blockchain.length - DIFFICULTY_ADJUSTMENT_INTERVAL];
    const timeExpected: number = BLOCK_GENERATION_INTERVAL * DIFFICULTY_ADJUSTMENT_INTERVAL;
    const timeTaken: number = latestBlock.timestamp - prevAdjustmentBlock.timestamp;
    if (timeTaken < timeExpected / 2) {
        return prevAdjustmentBlock.difficulty + 1;
    } else if (timeTaken > timeExpected * 2) {
        return prevAdjustmentBlock.difficulty - 1;
    } else {
        return prevAdjustmentBlock.difficulty;
    }
};
Timestamp validation
In the chapter1 version of the blockchain, the timestamp did not have any role nor validation. In fact it could be anything the client decided to generate. This changes now that the difficulty adjustment is introduced as the timeTaken variable (in the previous code snippet) is calculated based on the timestamps of the blocks.
To mitigate the attack where a false timestamp is introduced in order to manipulate the difficulty the following rules is introduced:
- A block is valid, if the timestamp is at most 1 min in the future from the time we perceive.
- A block in the chain is valid, if the timestamp is at most 1 min in the past of the previous block.
const isValidTimestamp = (newBlock: Block, previousBlock: Block): boolean => {
    return ( previousBlock.timestamp - 60 < newBlock.timestamp )
        && newBlock.timestamp - 60 < getCurrentTimestamp();
};
Cumulative difficulty
In the chapter1 version of the blockchain, we chose always the “longest” blockchain to be the valid. This must change now that difficulty is introduced. For now on the “correct” chain is not the “longest” chain, but the chain with the most cumulative difficulty. In other words, the correct chain is the chain which required most resources (= hashRate * time) to produce.
To get the cumulative difficulty of a chain we calculate 2^difficulty for each block and take a sum of all those numbers. We have to use the 2^difficulty as we chose the difficulty to represent the number of zeros that must prefix the hash in binary format. For instance, if we compare the difficulties of 5 and 11, it requires 2^(11-5) = 2^6 times more work to find a block with latter difficulty.
In the below example, the “Chain B” is the “correct” chain although it has fever blocks:

Only the difficulty of the block matters, not the actual hash (given the hash is valid). For example, if the difficulty is 4 and the block hash is 000000a34c… (= also satisfying the difficulty of 6), only the difficulty of 4 is taken into account when calculating the cumulative difficulty.
This property is also known as “Nakamoto consensus” and it is one of the most important inventions Satoshi made, when s/he invented Bitcoin. In case of forks, miners must choose on which chain the they decide put their current resources (= hashRate). As it is in the interest of the miners to produce such block that will be included in the blockchain, the miners are incentivized to eventually to choose the same chain.
Conclusions
An important property that a Proof-of-work puzzle must have is that it is difficult to solve, but easy to verify. Finding specific SHA256 hashes is a good and simple example of such problem.
We implemented the difficulty aspect and nodes must now “mine” in order to add new blocks to the chain. In the next chapter we will implement transactions.
The full code for this chapter can be found here.